您现在的位置是:Gái Gọi Phủ Lý - Phố đèn đỏ Mát Xa Sugar Baby Vitamin Girl > 时尚
Call of Duty: Modern WarfarGái Gọi Cẩm Lệ - Gái Đẹp Hội Độc Thân Ghép Đôi FWB Thổ dâne II Season 03 Reloaded — Alboran Hatchery Map Intel
Gái Gọi Phủ Lý - Phố đèn đỏ Mát Xa Sugar Baby Vitamin Girl2025-08-13 16:22:31【时尚】6人已围观
简介AlboranHatcheryGalicia,SpainDay03,11:00FactionsDeployed:SpecGru/KorTac EnteryourdateofbirthMonth:D Gái Gọi Cẩm Lệ - Gái Đẹp Hội Độc Thân Ghép Đôi FWB Thổ dân
Alboran Hatchery
Galicia, Spain
Day 03, 11:00
Factions Deployed: SpecGru / KorTac
Enter your date of birth
Month: Date: Year: Please enter a valid date. You may not access this content at this time Submit
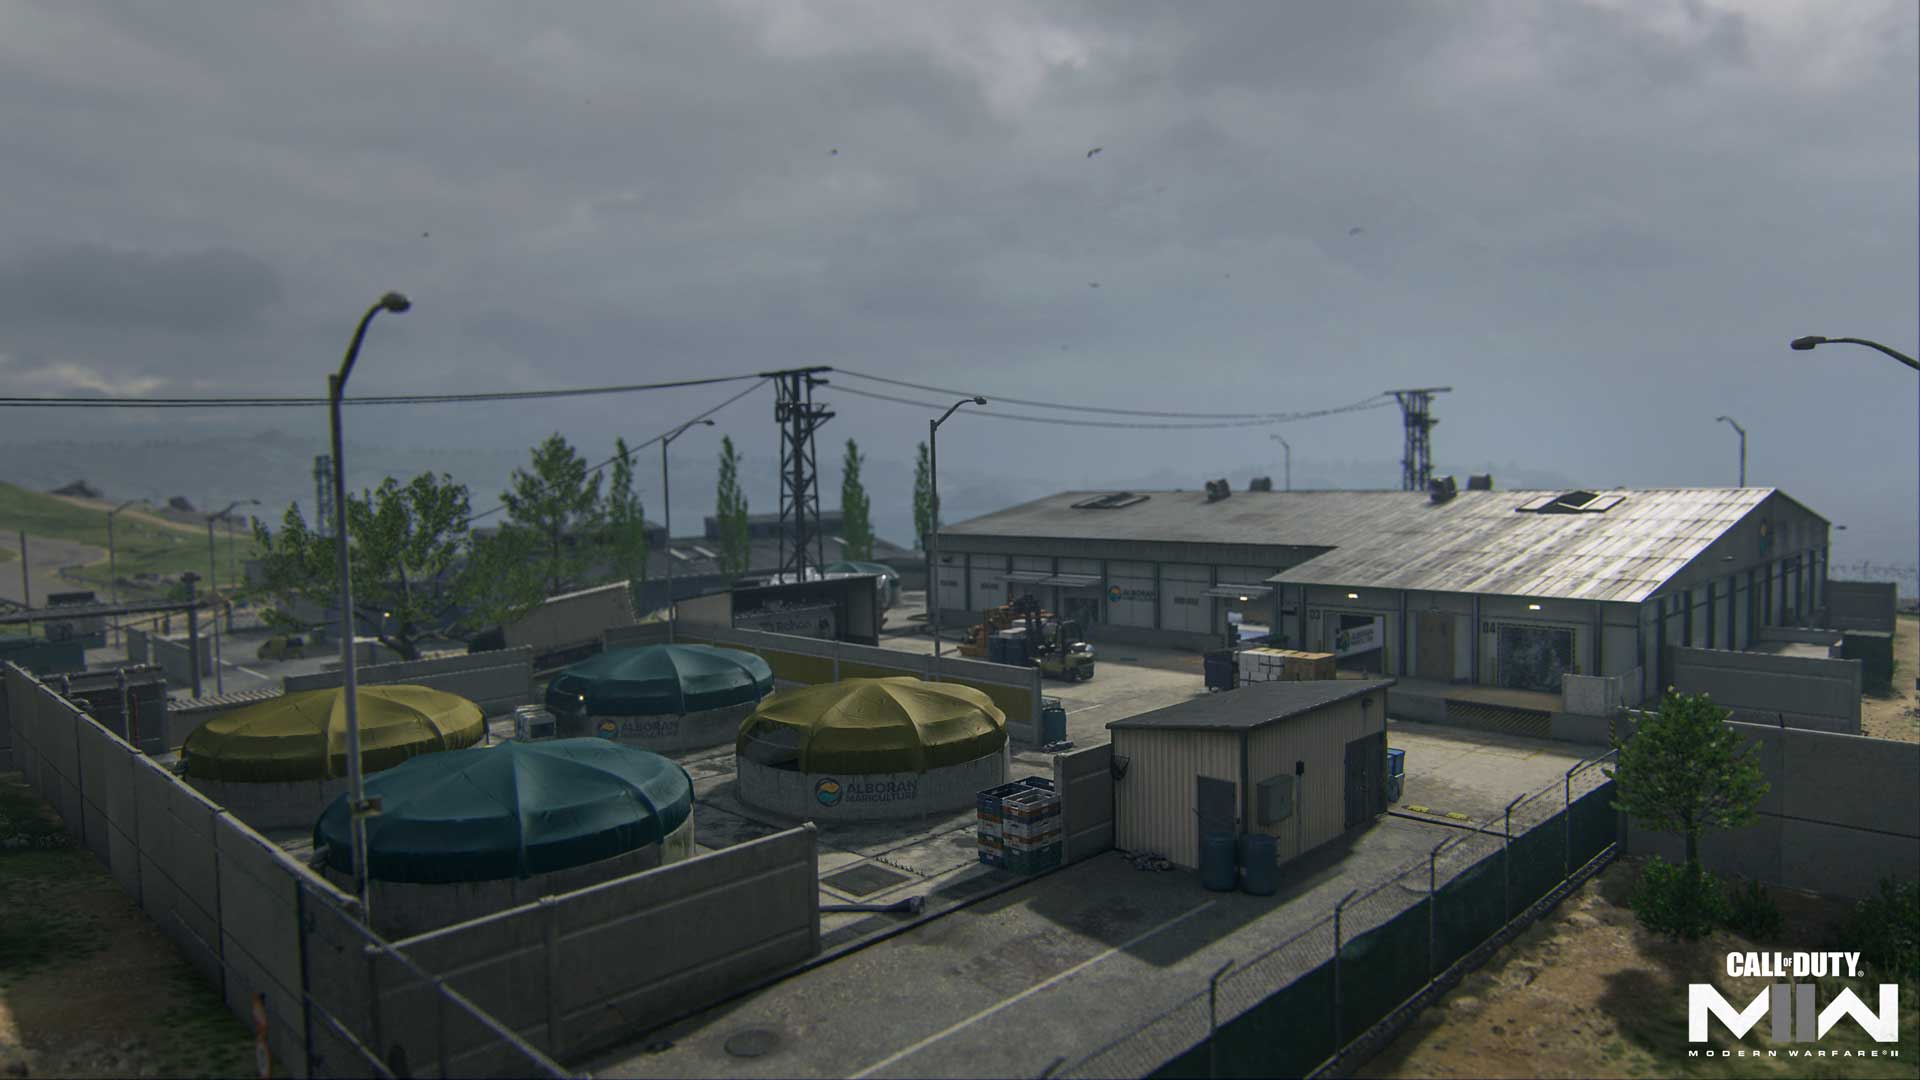
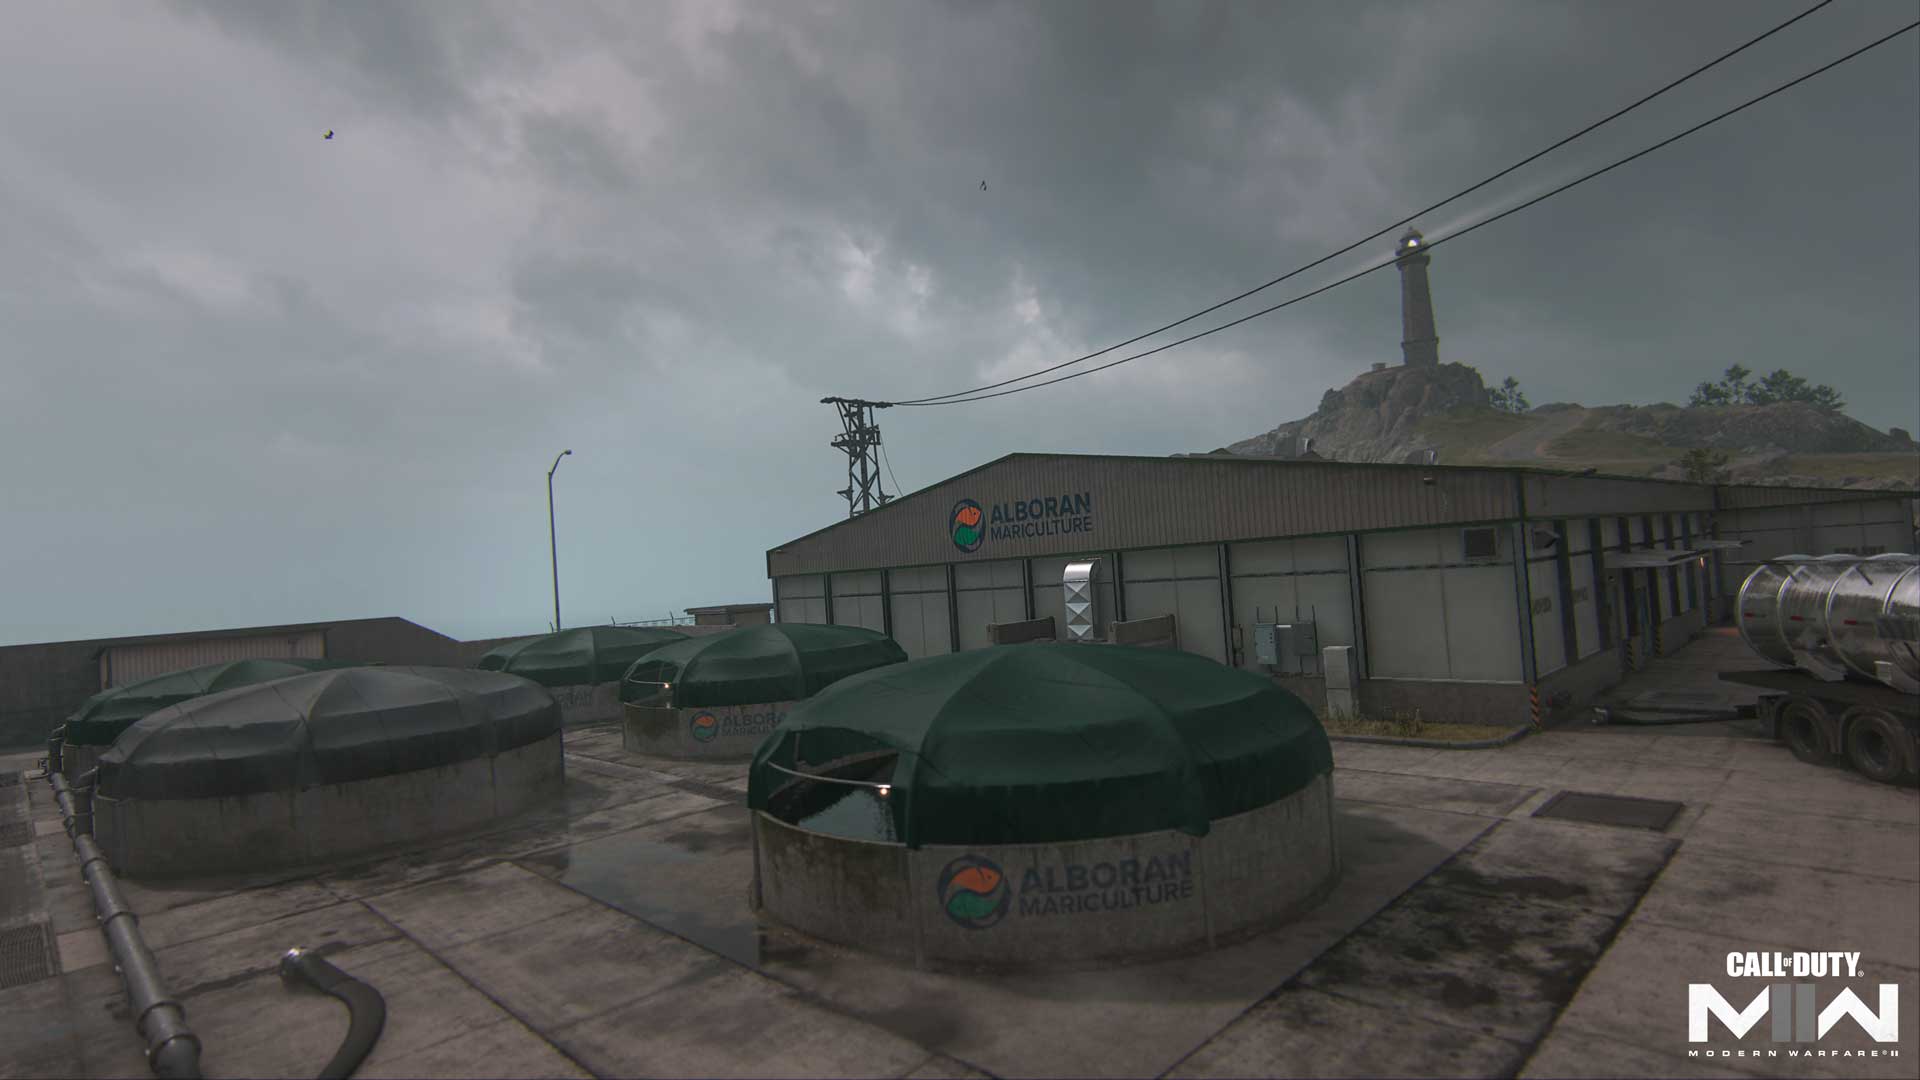
Prepare to deploy to Alboran Hatchery, a new 6v6 Multiplayer map launching as part of Season 03 Reloaded in Call of Duty®: Modern Warfare® II. On this medium-sized map, Operators must navigate in and around the hatchery’s storage and warehouse facilities set on a rolling green hill beneath towering wind turbines.
Use the large cover objects to conduct stealth operations around the map or climb up for a view of the surrounding area. It’s all about balancing exposure with intel-gathering here, with the best teams combining the two for a highly coordinated fight.
Spawn Point: KorTac
KorTac Spawn Zone (North) — Loading Area
Though the Fishery Warehouse is right by KorTac’s spawn-in location, the building doesn’t include rooftop access or south-facing windows. If you’re looking to engage the enemy right off the break, utilize your height advantage to move up and attack the enemy down the hill.
Be aware of your sightlines when moving up, always considering the Storage rooftop. Sometimes it’s better to stay low and out of view while other times you may want to climb up to better engage the enemy.
Spawn Point: SpecGru
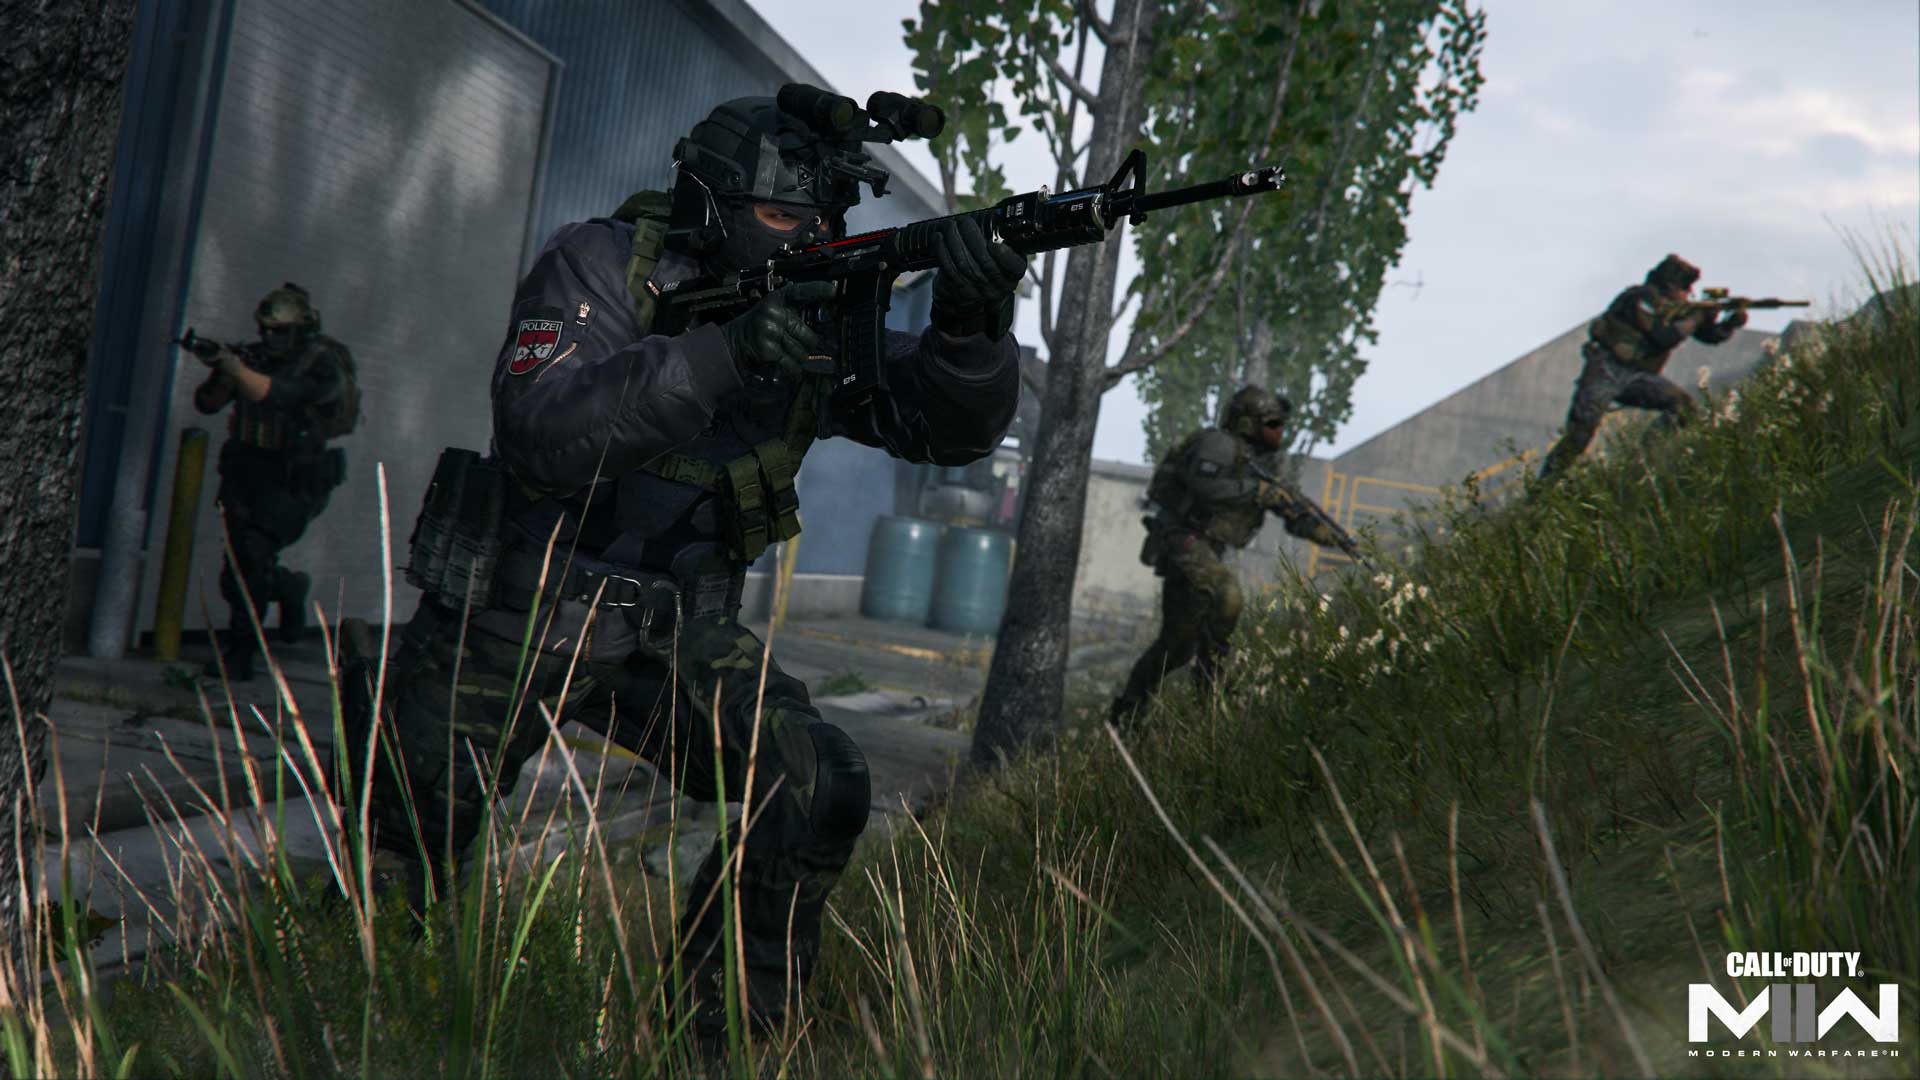
SpecGru Spawn Zone (South) – Shipping Area
SpecGru forces spawn behind the southern Storage, with options to burst through the building or move up along the perimeter. As the enemy team starts the match at a height advantage, you might prefer to climb onto the roof. From there you’ll gain a commanding view of the map with plentiful opportunities for long-range combat and scouting.
Midrange players may prefer instead to navigate on the ground floor, using the map’s large cover objects to control their sightlines while moving up toward the Fishery Warehouse.
Map Maneuvers: Route Planning
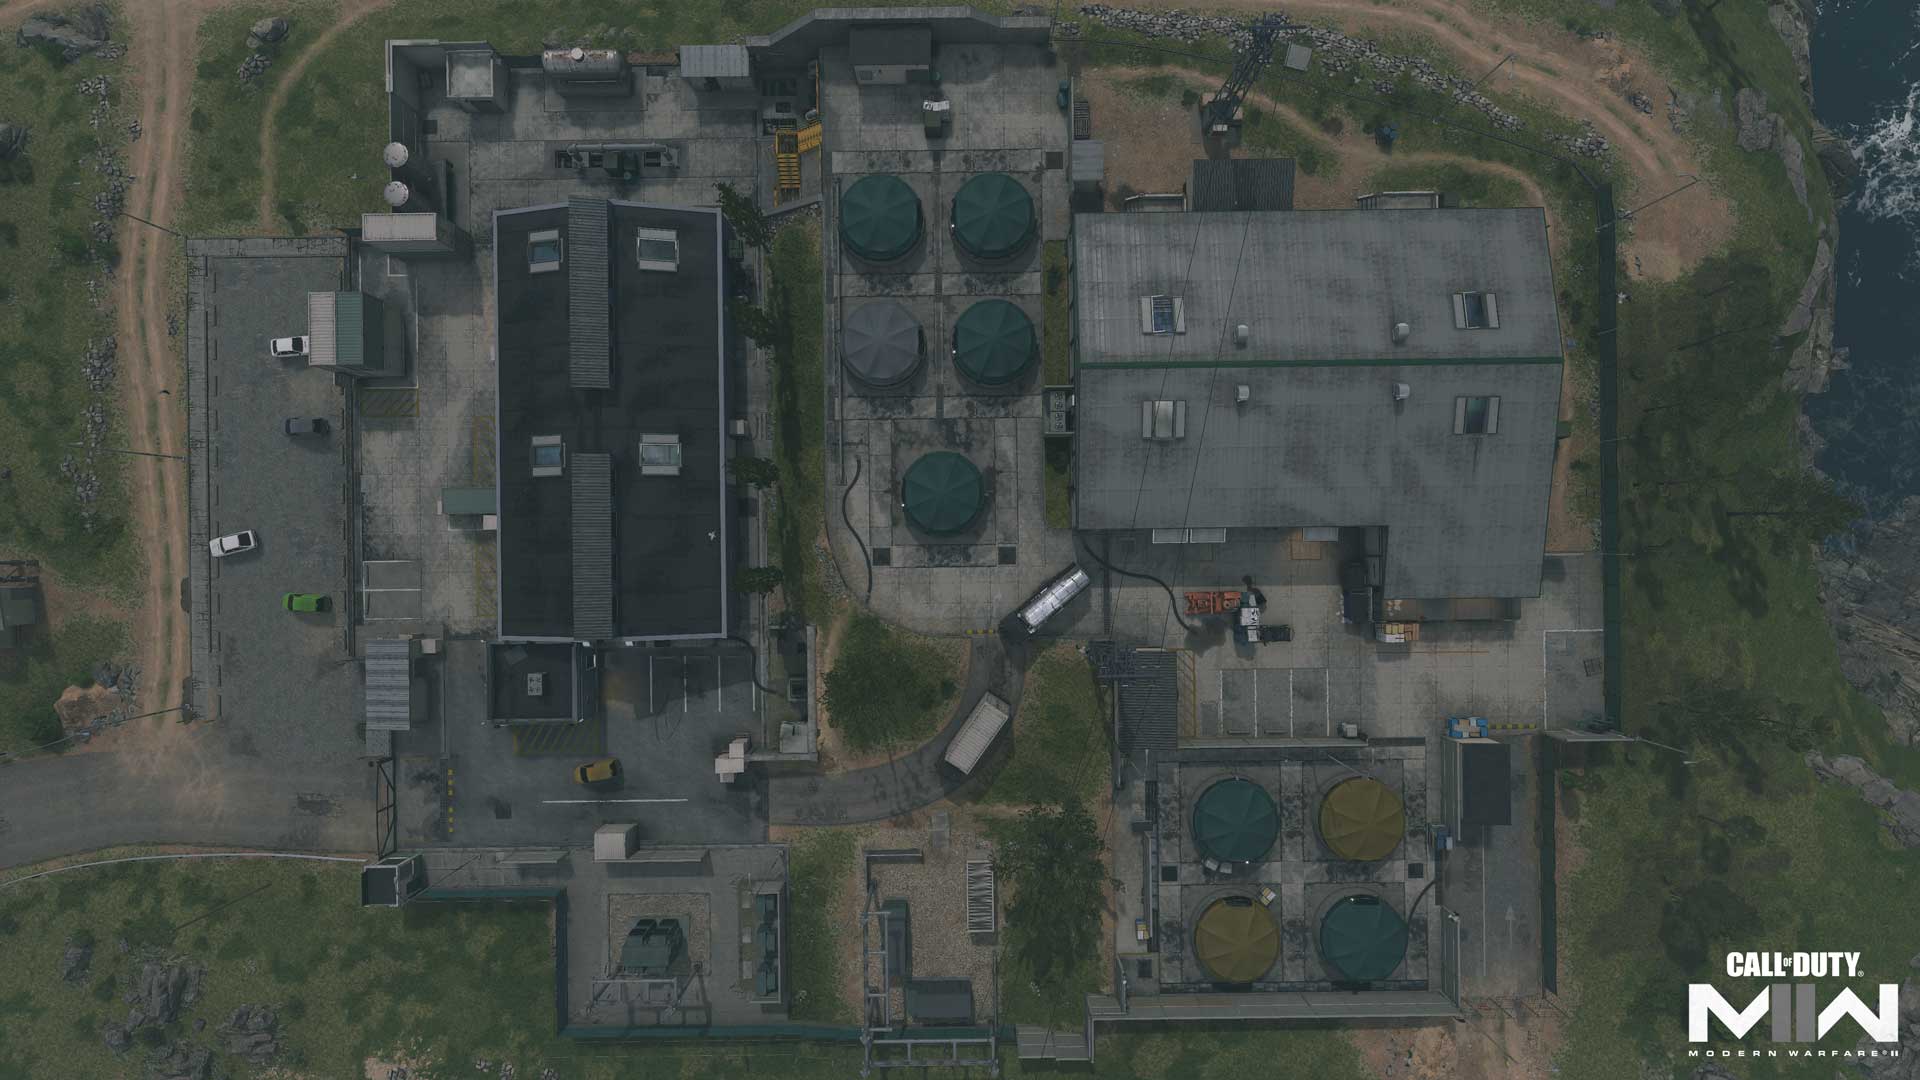
For the purposes of this guide, we’re breaking up Alboran Hatchery into four main sections:
- Fishery Warehouse
- Containers
- Main Entrance
- Storage Building
Fishery Warehouse
In its dominant position on the map’s north half, the Fishery Warehouse is a major thoroughfare with danger at every turn. Operators can navigate around the tanks and containers in search of their enemy or jump up and scan the area from above. It can get crowded in here fast, so consider the advantages of pushing the attack or slinking away and flanking.
Unlike the southern Storage building, the Fishery Warehouse rooftop is inaccessible. There are no south-facing windows to watch over the other side of the map, either. This focuses the fight on the inside of the warehouse, so be ready to engage on approach.
Containers
There are two exterior container zones: the central Mid Containers and the northern Side Containers. While positioned in different areas, moving through them presents largely the same challenges. Do you move slowly and carefully around the tanks, or climb up for a better view? Each presents its own risks and rewards. Note that even on top of the distant Side Containers, rooftop snipers on Storage can still take aim at your position.
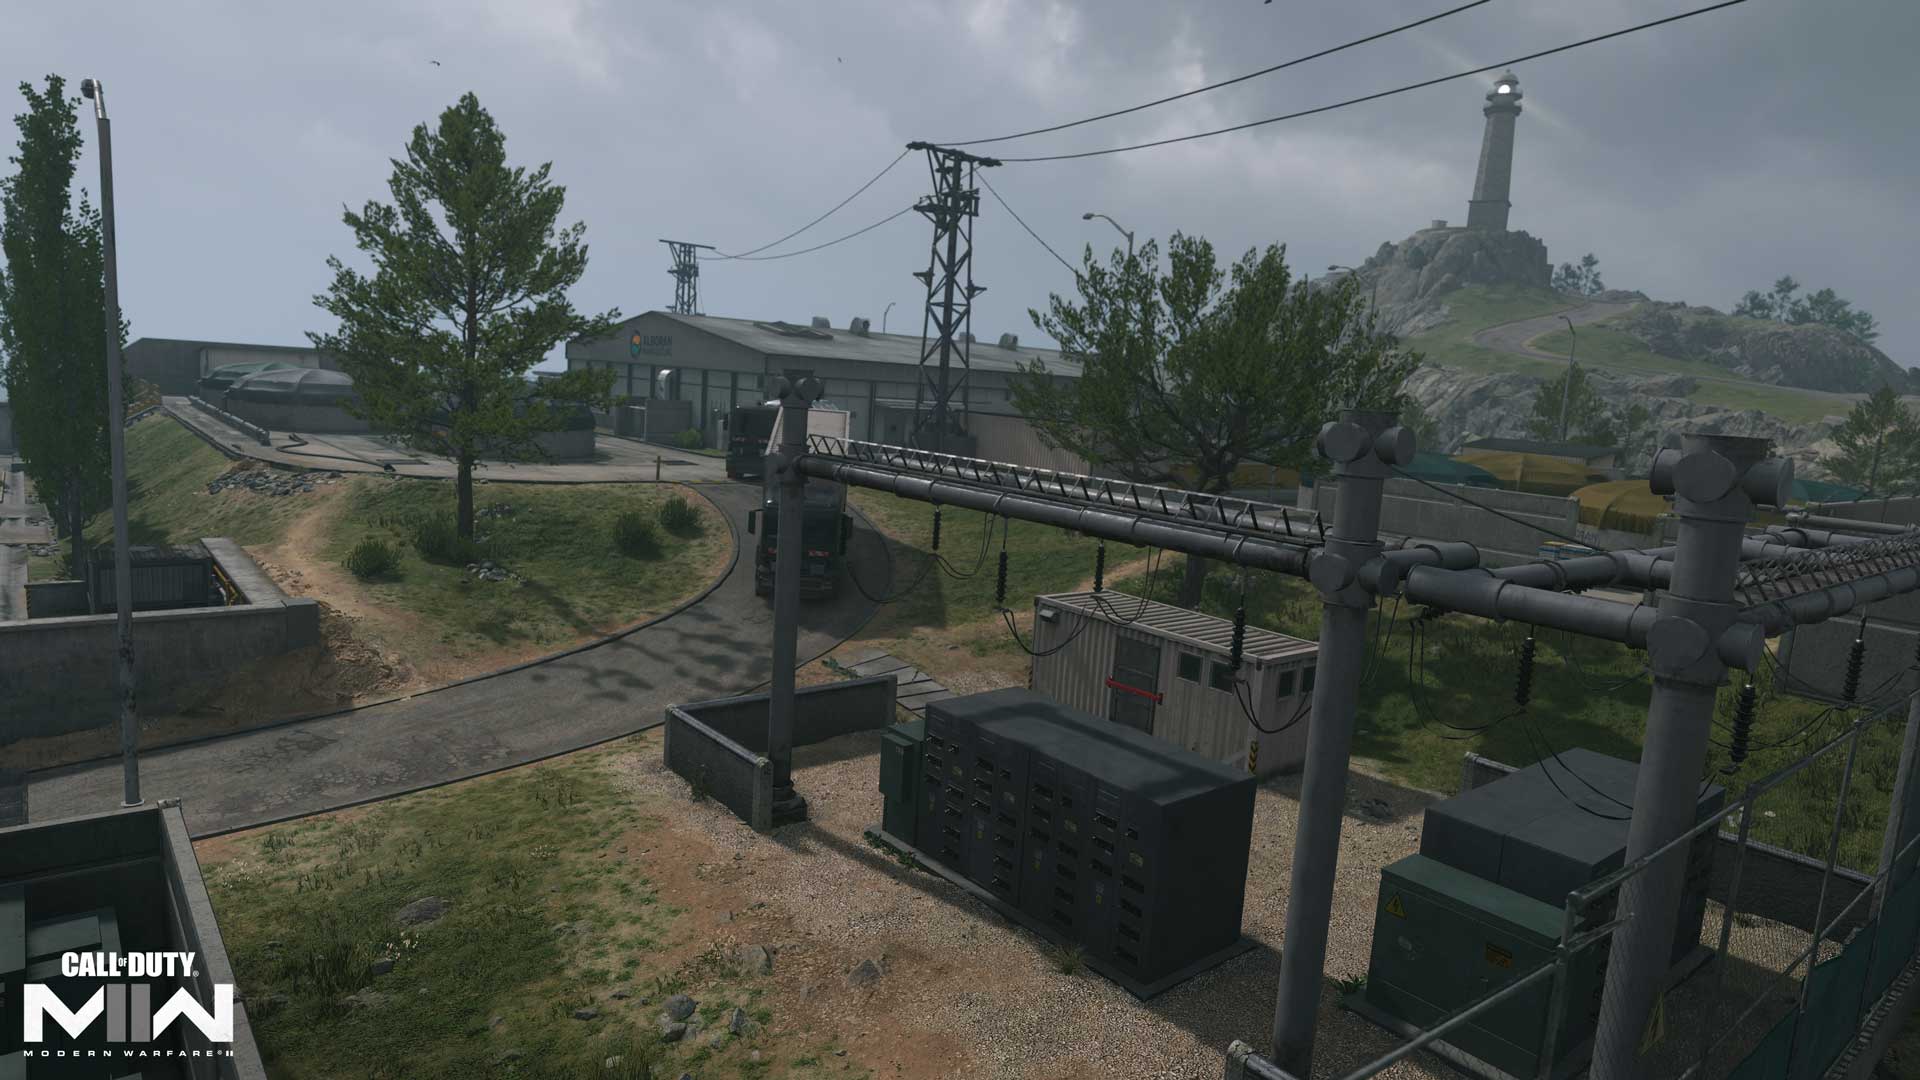
Main Entrance
For this guide, we’re including the eastern Electrical map section when discussing the Main Entrance, bordered by the two parked trucks. While midrange Loadouts will often trade shots up the hill, this area can be locked down with SMGs and Shotguns, too. Use the trucks, walls, and generators to minimize your exposure to long sightlines, forcing your enemies to engage at close range. If the fighting gets too hot, you can always slip away toward the Mid or Side Containers to keep engagements at arm’s length.
Storage Building
While positioned at the lowest point on the map, the Storage building hosts the greatest power position on its rooftop. With obstacles surrounding the perimeter, it’s easy to climb up and take aim at distant enemies. Each side of the roof has windows dropping down into the Storage interior as well, so you can quickly drop out of sight when spotted.
The Storage interior is more segmented than the northern Fishery Warehouse, with two main sections and the Foreman’s Office to the side. You can also move around the building’s flat perimeter; its west side leads to the yellow stairs climbing toward the Mid Containers and the east extends toward Electrical.
Objective Routes and Rotations
Mode Intel: Domination
Domination focuses the battle in and around the industrial buildings, with the A flag in the Storage Building, the C flag along the Side Trail next to the Fishery Warehouse, and the B flag in the middle of Electrical to the east. On a map this size, it’s most effective to fight for two flags and then hold your position. Flags A and B make a good combo, as players can use the Storage rooftop to get shots on B, or take A and C to keep the enemy contained in the east.
Communicate when you’re changing positions to keep your team evenly spread, and don’t hesitate to swap Loadouts when you need to adjust your playstyle. If the enemy team starts hammering one of your positions, consider pulling back and instead seek out their less contentious flag.
Mode Intel: Search & Destroy
Every tank, crate, and other large cover object takes on a sinister new meaning in Search & Destroy, as one small mistake can quickly lead to your elimination in the round.
Smart defenders will know to avoid the sightlines from the Storage rooftop as much as possible... Unless they trust their shot is true and they can pick off an inaccurate attacker.
It pays to move as a group, but how much you split up between the two bomb sites is up to you. Bring your full force to bear on one site or get loud at one while sneaking the bomb toward the other. Whatever your tactic, move up methodically and call out spotted enemies.
On defense, it can pay to hop onto one of the containers for a better view, though drop back down ASAP to avoid rooftop snipers. You’ll likely attract attention by showing off your position, giving you the advantage in setting up a defense. It may also be worth leaving a defender in the Fishery Warehouse who can readily rush to the defense of either bomb site as needed.
Mode Intel: Hardpoint
The fight intensifies in Hardpoint as players are taken around the map in a loosely counterclockwise direction from hill to hill. The hill order is as follows: Electrical, Fishery Warehouse, Storage Building, Side Containers, Mid Containers.
Expect the aerial streaks to light up when defending any of the three outside objectives, with more intimate battles erupting around the interior Storage and Fishery Warehouse points. Use scrap time to set up an early defense at the next hill, leaving one or two teammates along the path from the previous point to ambush enemies doing the same. Consider the Birdseye Ultimate Perk for a more zoomed out minimap to better track movement in and around the Hardpoints.
Top Tips
1. Just a peek. Use your excellent climbing ability to get up and over the tanks or to get on top of one of the center trucks. There are climbing opportunities everywhere here, and while you risk exposure in using them, the intel you’ll gain is often worth the price.
2. Recon in the air. Sometimes climbing onto something isn’t the best way to gather intel on the enemy, especially when you’ve got enemies scanning the horizon for such plays. The Recon Drone Field Upgrade is great in these situations, providing visuals and marking capabilities from above without exposing your Operator to harm.
3. A tool for every job. Sightlines change fast here, between close engagements near the containers and interior spaces and longer ranged fights breaking out across the map. Consider pairing the Overkill and Fast Hands Perks to spawn in with and quickly switch between two Primary Weapons, each focused on a different playstyle. Or you can opt for one of the new Season 03 Reloaded full-auto Handguns as your Secondary once you’ve completed their unlock challenges.
4. Off you go. Are enemy snipers having a field day on the Storage Building rooftop? Be an anti-sniper and circle around the back and sides of the building, climbing up at different points to attack players taking advantage of the power position. Clearing this rooftop makes it much safer for your team to move around on the ground.
5. Control the fight. With the cover options available to you, it’s largely your choice whether to pursue and press the fight in a skirmish or to fall back and let the enemy come to you. Always consider your current Loadout, the match needs, and your risk of exposure when determining how to best approach each battle.
6. Nice setup there. Hatchery’s many tanks, vehicles, and other large cover objects make it difficult to know who or what might be just around the next corner. Equip the Spotter Perk to see enemy equipment, Field Upgrades, and streaks through walls, helping you better determine exactly where the biggest threats are located.
7. Delivery on the way. Midsized maps like this are perfect for calling in Care Packages. Whatever team you’re on, there’s a good chance you can use one of the two buildings as cover while you call in the goods.
8. Ground siege. With the Fishery Warehouse and Storage Building providing air cover, you might want to consider ground-based streaks instead. Set up the Sentry Gun to cover the Main Entrance by Storage or atop one of the tanks for greater firing visibility. Call in the Wheelson-HS to hunt down Operators indoors and out.
9. Danger! Danger! Having trouble anticipating enemy movements? Equip the High Alert Ultimate Perk for a visual warning when an enemy player spots you outside of your view. When your vision pulses, get down, reposition, and hunt down the Operator who triggered the ability.
10. Mark your spawn. After getting some matches in, you’ll start to find your favorite spots, whether that’s holding it down inside or battling through the greater outdoor areas. With a Tactical Insertion on hand, you’ll have more opportunities to get back in the action exactly where you want to be . . . provided the enemy doesn’t destroy the flare.
Stay frosty.
© 2023 Activision Publishing, Inc. ACTIVISION, CALL OF DUTY, and MODERN WARFARE are trademarks of Activision Publishing, Inc. All other trademarks and trade names are the property of their respective owners.
For more information, please visit www.callofduty.comand www.youtube.com/callofduty, and follow @Activision and @CallofDuty on Twitter, Instagram, and Facebook.
Related ArticlesMay 03, 2023
Call of Duty: Warzone 2.0 and Call of Duty: Modern Warfare II Season 03 Reloaded Overview
Season 03 Reloaded brings the new Alboran Hatchery Core Multiplayer map, two new full-auto sidearms, Raid Episode 03, a new DMZ experience, the premiere of Warzone 2.0 Ranked Play, and more. Get ready to drop on May 10.
May 01, 2023
Support Veterans in Loot for Good, A Charity Extraction Challenge for Call of Duty: Warzone 2.0 DMZ
Between May 1 and May 7, Activision Blizzard will allocate $1 as part of a $1 million total donation to the Call of Duty Endowment (C.O.D.E.) for each DMZ match where at least $30,000 of in-game Cash is extracted. Track your progress on the Loot for Good leaderboard and earn an in-game reward for your efforts.
May 04, 2023
Ranked Play in Call of Duty: Warzone 2.0 — An Overview
Get ready to drop into this all-new Warzone 2.0 Ranked Play system. Learn everything you need to know about this mode, including rules, features, and rewards, in this miniature guide.
Back to Top Pre-order Vault Edition Previous Post| COD Blog
View All Call of Duty Posts
| COD Blog
View All Call of Duty Posts
Next Post
We're Hiring
Check Out Job Opportunities At Our Studios
Join Us
Our Teams
- Game Design
- Art & Animation
- Brand Management
- Production
- Quality Assurance
- Customer Support
- Studio Operations
- Programming
- Finance & Accounting
- Human Resources
很赞哦!(5)
站长推荐


友情链接
- 学前班教师总结个人(5篇素材参考)
- 成功名言:描写成功的名言
- 竞彩大势:国际米兰客战有险 拜仁实力致胜
- 恐龙快打道具介绍:武器篇
- 成功名言:描写成功的名言(三)
- 四川省第七届全民健身冰雪季花样滑冰比赛成功举办
- 小学生自我介绍简短作文(素材15篇)
- 董事长手牵年轻女子参加马拉松被拍到?A股公司深夜发声→
- 主题公园垃圾桶,景区的另一亮点
- 董事长手牵年轻女子参加马拉松被拍到?A股公司深夜发声→
- 忙忙忙!美国客户疯狂补货,中国外贸企业订单暴涨
- 阿森纳抢人!皇马亿元射手寻求离队,阿尔特塔竞标曼城签罗德里戈
- 2020江安大妙荷花体育赛事活动圆满落幕
- 曼城瞄准米兰中场核心替德布劳内 将在本月正式报价
- 女士中2640万与妹妹平分 称还要分给其它亲人
- Lịch thi đấu bóng đá hôm nay 16/5
- Kết quả bóng đá hôm nay 16/5
- 安溪龙涓美味:老菜瓮咸菜飘香
- 三年级作文:《知错就改的玫瑰花》
- 世预赛南美区:巴西阿根廷不败 秘鲁抢到附加赛资格
- 如何设置虚拟内存? 虚拟内存怎么设置?
- 如何给Win7任务栏上的输入法图标换个颜色
- Windows 7系统默认字体还原技巧
- 不锈钢模具冲压花盆生产工艺流程
- 三年级作文:《森林超市》
- 垃圾分类:应对气候变化的无声卫士
- 2020海沧区全民健身户外运动节暨全民健身运动会圆满落幕
- 国家集采后降价不降质 更多听障人群用上人工耳蜗
- 影视:同时穿越了无数世界
- 卖百吨黄金,从壁咚天仙妈开始
- 《咒语力量征服埃欧大陆》PC版下载 Steam正版分流下载
- 赛出斗志、赛出水平,2024年上海政法系统“政法先锋杯”篮球比赛开幕
- 【案例】浏阳经开区(高新区)永安污水处理厂尾水湿地工程项目
- 五年级550字作文母爱(精选12篇)
- Tottenham mất trụ cột trước chung kết Europa League với MU
- 生产调度述职报告
- 《亲爱的你》(卓依婷演唱)的文本歌词及LRC歌词
- Foxmail怎么设置QQ邮箱
- 西部陆海“氢走廊”正式投运
- 三角洲行动长弓溪谷航空箱收集攻略